I am trying a new (to me) blog software called Wordpress. To view the latest post please go to http://nhbees.wordpress.com/
Please let me know how you like the new version and thanks for reading.
John
Sunday, May 16, 2010
Saturday, March 6, 2010
Two Years of Lessons Learned
I recently had the honor of becoming the VP of our local beekeeping club. One of the opportunities this presents is the chance to help teach this year's class of new beekeepers–the first class being what equipment they should purchase. Naturally, this makes me think about my original purchasing decisions and what I would do differently if I was starting fresh today. This chapter looks back at what I think I did right and wrong with my equipment choices. The findings are based solely on my experiences and do not reflect the results others may have had.
 If you have been a reader of this blog, you are aware I chose to have 2 Beemax polystyrene hives (2 deeps and 3 mediums ea) with Pierco large cell frames in one and Mann Lake small cell plastic frames in the other. I also purchased 2 Beemax polystyrene top feeders and 2 packages of bees shipped from GA. While the Beemax hives have been excellent and my bees continue to survive the last 2 winters, I wish I had never bought the plastic frames. Compared to the wood and wax foundation I have used since then, I can only say that my bees prefer drawing comb on wax, not plastic. While plastic has several benefits over wax, i.e. easier to use and definitely more durable, I have never been able to get my bees to draw out all of the frames in a hive body. While I know other beeks who have great success with plastic, this Spring I will be moving all of my bees to wax. Besides, it makes better candles!
 My primary mistake with the hives was to mix deeps and mediums. Michael Bush is spot on. While this is a traditional configuration for Langstoth hives, I have found during the past 2 years that I seem to always have honey, brood or comb on the wrong size frame for the task I need to address immediately. By this I mean I have extra medium frames of honey when I really need deeps–like last Fall. Earlier in the year, the exact opposite was true. To make my life easier and to be able to respond to whatever the bees needs are I am moving all of my hive bodies to mediums. This way I will always have the right size frame available as everything in my apiary will be consistent. Plus, the days of lifting 90 pound deeps are over, allowing me to continue beekeeping well into retirement. The only caveat is to keep my honey frames separate from the brood frames so that the honey can remain cleaner.
 Speaking of frames and foundation, I believe there is something to be said for natural cell/small cell foundation. Two of my hives and the nuc are small cell while the other 2 hives are large. Too confusing... While I have not done a mite drop comparison to prove that small cell is better in my apiary, I believe it is from my inspections and I've decided to regress my 2 large cell hives to natural starting this Spring.
As for the feeders, in my apiary hundreds of bees have drowned in the polystyrene feeders over the past 2 years and I have quit using them. I really like the dual plastic tray feeders from Rossman Apiaries (G56 Hive Top Feeder). The screen the bees use for support is immensely safer for them to traverse as they feed vs the plastic sheet provided with the polystyrene. While I still have had bees drown using my new feeders, it is less than 2 dozen vs hundreds.
 As I have mentioned above, the Beemax hives have performed well but, in reality, so has my wooden hive. As I get older I find more joy in working with natural materials and even tho' the Beemax have proven themselves, I will only be adding wooden hives to my apiary this year. Now that I have a complete woodworking shop I can easily make my own hives at the quality level I prefer. I'll still keep using the Beemax mediums until they give out.
A comment about "starter" kits–those kits provided by the sellers that contain "everything you need to start raising bees". Today, I would avoid purchasing starter kits and buy exactly what I need, not what a marketing/sales person wants to sell me. Why? First off, I NEVER use the beekeeper's gloves they provide. Being respectful to the bees while working their hive requires manual dexterity. On a scale of 1-10, those gloves reduce my dexterity to a 3. I only let visitors who are not going to be in the hives wear them so they feel protected. Secondly, I have not found a starter kit that allows me to just buy mediums. Third, the veil, the included book, the queen excluder and the feeder are useless to me. I would rather spend my dollars on an extra hive tool, a good veil/jacket combo and a feeder that works better. As for the book, buy the new edition of Kim Flottum's Backyard Beekeeper. It's the best book I've read for newbies.
Lastly, the bees. If you look at my early postings you will see that the first year I lost both queens and had to purchase a nuc to combine with Hive 1 so it would survive. The best way to start a a hive is from a nuc. A nuc from a reputable breeder has a laying queen that is already well accepted by the colony, a couple of frames of brood and, most often, has been raised locally and is suitable for your climate. I know so many beeks that have had the same distress I had the first year that I simply cannot recommend buying a package of bees that has been shipped 800 miles, been chemically treated and has a queen that may not even be the same race of bee. The trouble is that is what is most available to us and the way most new beeks have to start. It's actually how I will populate my top bar hive this year. Hopefully, it will be the last package I ever buy. Smart beekeeping means to be prepared in advance and know where you can purchase a local queen should yours come to an early demise.
So how did I do 2 years ago? Not that well. I spent the last half of my first season fighting to keep my hives alive, I spent a lot of money on things I did not ever need or use, bought hive bodies the wrong size and now have to replace them as well as all of my original frames. Meanwhile, my bees still did fine tho' possibly would have done better if I had not tried so many variables. The right things I did was buying a solar powered bear fence, reading, reading, reading and joining www.beesource.com. The absolute best part is I still have never chemically treated my bees and my hives continue to survive (said with crossed fingers which makes it really hard to type). I have learned what my bees seem to prefer and I have the wherewithal and desire to correct my mistakes. The top of this blog states that you will see the things I try and learn of my successes and failures. You've just met my failures. Meanwhile, I know other beeks who have had great success and swear by many the things I am changing. May their bees continue to prosper as I know my bees now will too.
Thursday, February 25, 2010
A Recap of Year 2
 Seems strange to begin this year's blog immediately after plowing 15" of snow from the driveway but it's good to dream of warm summer days ahead. Last year's beekeeping ended with a thud. Gayla's dad suffered a massive stroke in September-just as work travel accelerated-leaving precious little time for tending to the bees.
 The best news is Dad is an obstinate ol' bird and refused to give in to the stroke and is recovering wonderfully! Now to the girls...
As I said, my getting the hives ready for winter was seriously cut short. When I left the hives in August, everything seemed to be going well. I had anywhere from 2-3 supers on all the hives and thought all would be fine. When I returned to the apiary in October, I was surprised to find the deeps were basically empty and the hives were very light. I immediately started feeding 2:1 syrup. Luckily it stayed warm enough for the girls to go through over 40 pounds of sugar before it became too cold.
 I installed a bamboo reed windbreak on the North side of the the 3 main hives and piled evergreen boughs against the back of the other hive and nuc (pic 3). I still thought a couple of the hives were light so I decided to try the Mountain Camp Method of feeding. This is where you add a medium to the top of the hive, line it with 1 sheet of barely damp newspaper and pour in granulated sugar to provide food for the bees during the colder months (see pic 4). Make sure you lightly wet the edges of the sugar pile to help them start to take it. Replace your inner and telescoping covers back and cross your fingers. This will not only serve as a food source, it will also help reduce moisture in the hive as the sugar will absorb it. The bees will eat through the newspaper and hit the sugar as needed. I do believe this will be a mess come Spring and should only be used in a definite emergency. This pic is from a couple of weeks ago.
 Since I have done this, I have learned that this technique may actually increase the chance of nosema, as pure sugar changes the pH of a honey bee's stomach, making it more susceptible. Hereis an excellent discussion about this started on Beesource.com by Michael Palmer www.beesource.com/forums/showthread.php?t=237506 It is definitely worth reading and is a big reason why I will not try this again and will pay A LOT more attention to my bees in August through October. Michael is a phenomenal beek with over 700 hives and nucs in northern VT. I have one of his queens and have 2 more already on order for my June splits.
Current Conditions:
 This is the most dangerous time of the year for northern hives. The bees are getting low on stores and the queens are starting to want to lay. It's critical to make sure they have food or the hive simply will not make it until Spring.
As of last weekend, the ladies were out and buzzing in all hives and the nuc. I added a pollen patty to 3 of the hives late January (pic 4) and, except for Hive 1, they were definitely devouring them. All of the hives seem quite content. Hive 1 has a very small cluster and a fair amount of bee excrement on the front of the hive. As they are Buckfast, I am not worried about the cluster size. When I checked inside, the hive appeared clean so I'm not sure if I have a nosema problem or not. There is plenty of honey left which is not surprising for Buckfast honey bees. Again, I do not treat for any condition with the exception of starvation and if I manage my hives properly I will not have to worry about that either.
Plans for Spring:
Assuming they all continue to survive, this year I hope to be able to split 3 of the 4 hives and will definitely move the nuc into a new home. That will make 8 hives, 2 of which will be off site. I intend to also build a Kenyan top bar hive (TBH). I need to decide if I'm going to try to use my bees or buy one last package to get it started. No offense intended, however I hope to never again buy a package from down south. Many of the packages (forget the queens!) do not even make it to Fall, they increase the chance of importing Small Hive Beetles, mites and other parasites, as well as increases the chance of bringing Africanized genetics into our area. I am seriously trying to generate all of our bees from overwintered hives and nucs. More on this and TBH later.
Come on Spring!
Saturday, August 22, 2009
More queens, no mites (for now...)
Yesterday was our wedding anniversary so what better way to spend part of the day than in the apiary. The weather started out sunny, warm and humid but after 60 minutes with the girls, turned windy and threatened to rain so we ended the inspection a bit early.
First, a tip for this posting and then what we found in the order of inspection.
 Tip:
Tip:
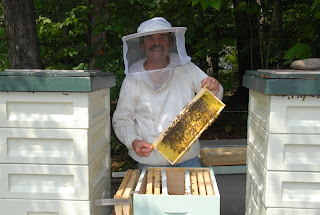
It's really exciting to see the bees making supers full of honey (fig 1), especially as a new beekeeper, but you have to remember it's their food, not yours. It's bad hive management to take the honey the bees will need for winter and then try to make it up by feeding syrup. Syrup is best used to start a package or for emergency purposes only. It is not as nutritional as the honey the bees make from nectar and recent studies in Sweden have shown syrup actually changes the pH of the bee's honey stomach from 4 to 6. I have been told that is the same pH you would use in a lab to grow Nosema ceranae. When the bees have already produced enough honey to support themselves for winter, why risk loosing a hive just so you can have a bit of honey? Make sure you leave 2 deeps or 3 mediums full of bees, pollen and honey as we enter the cold months.
 Nuc Inspection: Small cell, deep and medium wooden supers
The bees did their job (after killing the queen I gave them) and have raised a beautiful dark queen of their own (fig 2). She has been busy and has a laid a nice center pattern on both sides of a frame with the bees packing pollen and honey around the brood (fig 3). The bees are barely starting to draw out the wood and small cell wax frames in the top medium. They will get going now that they have a queen who will need some room. Figure 4 is a shot of her actually laying an egg.
Hive 4: Large cell, deep and a medium BeeMax supers
Last inspection revealed 23 emergency cells. This time all of the cells are empty with most having been removed by the workers. No eggs or brood were yet present but the timing is right for the new queen to be out on her mating flight. I absolutely expect to find the signs of her return when we next open the hives on Sep 3rd. If she is anything like her mother, this will be a very productive hive.
 Hive 3: Small cell, deep and medium wooden supers
This hive, like the nuc, was a split from Hive 2 and was immediately requeened with one of Mike Palmer's Northern Hybrid queens. A very quick look at this hive showed the bees have drawn out the center frames of the medium, making a very bright yellow comb (fig 5). The queen has started laying in the medium. I will probably add another medium in September and give this hive some of the honey from hives 1 and/or 2.
 Hive 2: Small cell, 2 deep and 3 medium BeeMax supers. Queen excluder on top of 2nd deep
This hive went queenless and has also raised a new matriarch who is laying in the 2nd deep. There are numerous drone cells but also several frames of worker brood. My first thought was I have a laying worker but the normal brood has me hopeful. The great part of this inspection was there are zero, nunca, nada, the null set, of Varroa in any of the drone cells, and I checked over 20 of them! The bottom deep was packed with pollen and honey on 8 frames but they still have not touched 2 of the Piercos in the bottom deep. I moved them to the center to see if that will help.
 Actually, after inspecting the pictures Gayla took, I did not find any mites in any of the hive pictures. With 2 of the hives and the nuc requeening, we broke the mites' breeding cycle and have momentarily conquered the mite problem. Even queen-right Hive 3 looked clean!
Due to incoming weather, we never opened Hive 1. Our next inspection is Sep 3 with Ross Conrad leading a class in our apiary! Life is good...
First, a tip for this posting and then what we found in the order of inspection.
 Tip:
Tip:It's really exciting to see the bees making supers full of honey (fig 1), especially as a new beekeeper, but you have to remember it's their food, not yours. It's bad hive management to take the honey the bees will need for winter and then try to make it up by feeding syrup. Syrup is best used to start a package or for emergency purposes only. It is not as nutritional as the honey the bees make from nectar and recent studies in Sweden have shown syrup actually changes the pH of the bee's honey stomach from 4 to 6. I have been told that is the same pH you would use in a lab to grow Nosema ceranae. When the bees have already produced enough honey to support themselves for winter, why risk loosing a hive just so you can have a bit of honey? Make sure you leave 2 deeps or 3 mediums full of bees, pollen and honey as we enter the cold months.
 Nuc Inspection: Small cell, deep and medium wooden supers
The bees did their job (after killing the queen I gave them) and have raised a beautiful dark queen of their own (fig 2). She has been busy and has a laid a nice center pattern on both sides of a frame with the bees packing pollen and honey around the brood (fig 3). The bees are barely starting to draw out the wood and small cell wax frames in the top medium. They will get going now that they have a queen who will need some room. Figure 4 is a shot of her actually laying an egg.
Hive 4: Large cell, deep and a medium BeeMax supers
Last inspection revealed 23 emergency cells. This time all of the cells are empty with most having been removed by the workers. No eggs or brood were yet present but the timing is right for the new queen to be out on her mating flight. I absolutely expect to find the signs of her return when we next open the hives on Sep 3rd. If she is anything like her mother, this will be a very productive hive.
 Hive 3: Small cell, deep and medium wooden supers
This hive, like the nuc, was a split from Hive 2 and was immediately requeened with one of Mike Palmer's Northern Hybrid queens. A very quick look at this hive showed the bees have drawn out the center frames of the medium, making a very bright yellow comb (fig 5). The queen has started laying in the medium. I will probably add another medium in September and give this hive some of the honey from hives 1 and/or 2.
 Hive 2: Small cell, 2 deep and 3 medium BeeMax supers. Queen excluder on top of 2nd deep
This hive went queenless and has also raised a new matriarch who is laying in the 2nd deep. There are numerous drone cells but also several frames of worker brood. My first thought was I have a laying worker but the normal brood has me hopeful. The great part of this inspection was there are zero, nunca, nada, the null set, of Varroa in any of the drone cells, and I checked over 20 of them! The bottom deep was packed with pollen and honey on 8 frames but they still have not touched 2 of the Piercos in the bottom deep. I moved them to the center to see if that will help.
 Actually, after inspecting the pictures Gayla took, I did not find any mites in any of the hive pictures. With 2 of the hives and the nuc requeening, we broke the mites' breeding cycle and have momentarily conquered the mite problem. Even queen-right Hive 3 looked clean!
Due to incoming weather, we never opened Hive 1. Our next inspection is Sep 3 with Ross Conrad leading a class in our apiary! Life is good...
Saturday, August 8, 2009
 Hi, sports fans and welcome to the "Now what the heck are they doing?" version of the blog. First, I must apologize for not keeping up with the observations. It's been about a month since I've added anything. A lot has happened, including harvesting 28 pounds of golden amber honey from 6 frames of Hive 1. The problem is, well not really because it's what I do, work is incredibly busy and is winning the competition for time. I will try to do better. I've also decided I want to add a tip with every installment I write. Here is the first.
Tip:
When inspecting your hives, always bring along a camera. It doesn't matter if it's a point and shoot or a high-end Nikon–just make sure it's at least 8megapixel so you can enlarge the image. Take pictures of several of the frames as you pull them. Get as close as you can or use the optical zoom on your digital camera. You can buy frame hangers that allow you to hang frames on the side of the hive or have a companion hold them for you. That evening, load the images onto your computer and take a careful look at every image. Many programs allow you to edit your images (i.e. iPhoto on a Mac). By going into the edit mode you can greatly greatly increase the mag as you scan every picture. You'll be amazed at what you missed when you were inspecting the hives! It's a great way to check for Varroa, catch interesting bee behavior or just study your bees. You can never see everything during an inspection. Having pictures for later really helps!
Today:
Looking at the colonies today was remarkable. What a beautiful day to be in an apiary. Gayla joined me and we had a wonderful time going through all 4 hives and the nuc. Here's what we found, in order of inspection.
Nuc:
Since the previous post, I discovered the bees offed the queen I installed. Not very considerate of them since she cost $20 and lasted about 10 days. A couple of weeks ago, I opened the hive expecting to see her laying away, only to find 13 emergency cells. Today, still no eggs or brood, the cells are gone and hopefully the queen is out on her mating flight. The bees were very calm, making lots-o-honey and just starting to draw out the small cell wax in the medium I put on them last week. I will leave them alone for another 10 days and see if there is a new queen in the house.
Hive 4:
 This was a split from Hive 1 as I have really been impressed with the queen and wanted them to raise another. The split was 3 partial frames of eggs/brood and several of honey and pollen. It's a large cell hive which I intend to eventually change over to small cell. The split kept Hive 1 from swarming.
Last weekend I inspected this hive and found all of the eggs and brood had already hatched, the bees never made any queen cells and there were only mature bees in the hive. I tried unsuccesfully to find a queen this week and planned to do a paper combine today with Hive 3 (go to www.Beesource .com and do a search). I opened 3, put the newspaper in place across th etop of the hive and placed another wooden deep on the paper. I then opened Hive 4 and started to onspect each frame as I put it in the new deep on Hive 3. After moving 2 frames of honey, I was surprised to find a frame that had 13 queen cells on 1 side and at least 10 on the other! (Figure 1 and 3) I have no idea how they did this as I swear there was no brood or cells last week. Inside every queen cell was a larva floating in royal jelly! (figure 2) You could have knocked me over with the hive tool. (not shown...) I took a quick look at the rest of the frames but this one was the only one with cells. I quickly retrieved the 2 frames of honey from the combine and closed the hive. I will probably not check this for at least 2 weeks to give them time to hatch a queen, let her harden and then mate. Incredible...
Hive 3:
 This is also a split but from Hive 2. I added a queen from Michael Palmer to this split and she is laying like there is no tomorrow. I added a medium to this last week and hope to eventually have this hive become all mediums. It's small cell and doing great!
Hive 2:
Now this was a surprise. Queenless...No idea what happened to her but there wasn't a bit of brood anywhere in the hive. They are pounding out the honey in the 3 mediums on top of the 2 deeps. Oddly, several of the Mann Lake 100 frames sitting in the deeps all year still are not drawn out. I moved them into the center of the boxes and closed them up. I do not remember seeing many queen cells in the hive but there were a few. As I mentioned, I was very surprised to find this. They had already made a queen this year. Evidently they were not impressed! I'll open this up in 2 weeks and hopefully I will be...
Hive 1:
 Now this is a star hive! Two medium honey supers on top of 2 deeps and another medium for the brood. This is a large cell Buckafast hive and this queen ROCKS! The 2 supers are almost filled with honey , albeit, the comb building is very crazy in one of them. The really impressive thing was seeing capped brood, eggs and larvae in all 3 boxes below the excluder! (Figure 4) We never saw the queen which did not surprise me since we used smoke to move the bees away from the excluder when we took it off. I think we probably drove her into the lower deep. None the less, new eggs, larvae and capped in the medium and repeated down below. Most of the outer frames all filled with nectar, pollen and/or honey. I pulled 5 or 6 drones out of their drone cells and checked them for mites. Two had them, 4 did not. A very good sign! This is the stellar hive!
All in all, not a bad day. Two queen right hives, 2 hives and a nuc doing what they do by making their own queen. I wish they were all queen right but it's bee keeping and it's never about what I want. And I actually like it that way.
Sunday, July 12, 2009
And Then There Were Four
 Well, 4 1/2...
Looks like we've finally been deemed worthy of good weather! Last week I assembled a new Beemax hive from Betterbee and painted it to match the other 2. I had just enough time Friday afternoon to make a new hive stand from pressure treated lumber. I built it to match my original stand so I guess I will be adding 2 more hives next year. Once I have 6, I think I'll manage the hives to produce a few nucs and additional queens to sell each year.
I was out in the apiary early Saturday morning before the bees were very active. I wanted to position the new stand before they were really out and about. The ground (better known as mud...) is not very level and full of tree roots. Once I had the stand positioned, I chopped the roots out and leveled the stand by digging holes for the right side legs to sit in. Once the stand was level left to right, I made sure it was slightly lower in the front. By level bubble, it's about 1/2" lower. This allows any water from rain or snow melt to easily flow away from the front of the hive. Once I placed the new hive body (now called Hive 4, catchy name, eh?) and the nuc, it was time to split Hive 1 (fig. 1).
 Last week, I noticed Hive 1 was teeming with bees and had started 3 swarm cells. I removed the cells and added a medium to try to give them something else to do for a week and yesterday revealed they had already started to draw out comb in the super. Looking through the top deep showed 4 more swarm cells, 5 frames of capped brood, larvae and eggs, a couple frames of pollen and 3 frames of nectar with a little capped honey. The bottom deep had 3 frames of brood, another of pollen and a couple more of nectar, the rest was open comb from recently hatched bees. I never found the queen but she had obviously been busy! After cutting out the swarm cells I moved 3 frames of brood, 1 of pollen and another of nectar to Hive 4. I filled the empty slots in both hives with new large cell, black Piercos and sprayed them with HBH to entice the workers, added a feeder to Hive 4 and closed up the hives. I do not know if the queen is in Hive 1 or 4 and do not really care. I want the queenless hive to make a new queen which is why I made sure both hives had a lot of eggs, larvae and capped brood. I should know which has the queen within a couple of days by the hive's behavior.
 Since I had moved workers and nurse bees into the new hive but did not move the hive more than 2 miles away (more like 14'), I decided to place a tree branch immediately in front of the entrance reducer (again, Fig.1). The nurse bees have never been out of the hive so do not know where their hive is located. Not true with the worker bees. They know exactly where Hive 1 is and if I do not make them re-orient immediately upon leaving this new hive, they will eventually return to Hive 1. By making them re-orient, most of them will now return to Hive 4 and my population will remain high. This is exactly what they did when they started to venture out. I'll post a video here in the tnext couple of days to show this happening.
Meanwhile, this past week has worked well for Hive 3 and the nuc. I checked the queens on Monday and ended up letting them out of their cages and watched them disappear into the hives. I started feeders on both and have given Hive 3 two gallons of 1:1 syrup this week. I took a quick look at both yesterday to see if I could find the marked queens. As you can see from figures 2 and 3, Mike did a great job marking them and they are very easy to find (green is the color for 2009). Both queens are well accepted and should be laying eggs when I check next week.
Monday, July 6, 2009
New Matriarchs!
 The queens from Michael Palmer arrived just as he promised on Friday. Many thanks to Theresa, our mail carrier, for delivering them to me!
I added one queen to the new split and was scratching my head about what to do about the other. I had planned on putting her in Hive 2–the hive I had recently split. Hive 2 has had an abnormal amount of drone cells and I was afraid I had a laying worker. Instead, when I opened up the hive to inspect it before adding the new queen, out walks a long, slender, dark colored queen! The overall brood pattern was much better and no drone cells north of the excluder in the the honey supers. Hooray! They had enough and made their own! I sort of expected to find a new queen when I opened the hive. Last Tuesday, the bees quit bearding and everyone was back inside the hive. While not a sure sign, it made me suspect a mated queen was in residence.
As great a find as that was, it left me with a dilema as to what to

do with the 2nd queen from Mike. These are daughters of hybrid queens that have already survived northern Vermont winters and are treatment free. I'm thrilled to add these genetics to the bee yard! Combined with the Buckfast and Russians I already have, these queens will further expand the gene pool of my local drones when I try to start raising queens next year. Out of deeps, I finally took another couple of partial brood frames from Hive 2, added a frame of pollen and placed 2 frames of honey in a deep nuc. I placed the queen cage between the 2 frames of brood candy plug up with the screen perpendicular to the brood frames to allow the bees to feed her, sprayed the frames with HBH and added a boardman feeder with 1:1. To say that the bees in the hives were instantaneously drawn to the queen cages is an understatement. There were bees on the cages before I could even get close to installing them.
Today being day 3, I came home and looked in to see if the
 queens were released yet. Finding both queens still in the cages but surrounded by relaxed bees, I released the queens into their new homes. Both immediately dove into the middle of the hive and disappeared. I'll check them out in about a week and see if they've truly been accepted and are laying eggs.
The other good news is Hive 1 has exploded with honey and brood. They've started swarm cells, so I added a medium of undrawn Pierco frames to give them something to do until my new Beemax hive arrives from Betterbee. I'll split the hive this weekend and let them raise a daughter of the existing queen. She is a phenomenal producer and I want to keep her genes in the yard.
With so much to do during this hive inspection and queen installation I did not shoot many pics. Figure 1 is a bad shot of one of the marked queens. Green is the color for 2009. Figure 2 is one of the girls working the spirea this past weekend and Figure 3 is the new layout of the apiary. The tan box in the background is for storage so I do not have to cart everything out to the yard every time.
Subscribe to:
Posts (Atom)